Friday, April 12, 2024

Mixology Maybe?

 Hello!

Welcome to my little crafting place! 
This time I've another card using dies from one of the new April collections:  Propagation Garden Collection by Annie Williams/
This time I just used three of the containers from the Laboratory Glassware 
I used the cute jar from the set on a card I shared earlier


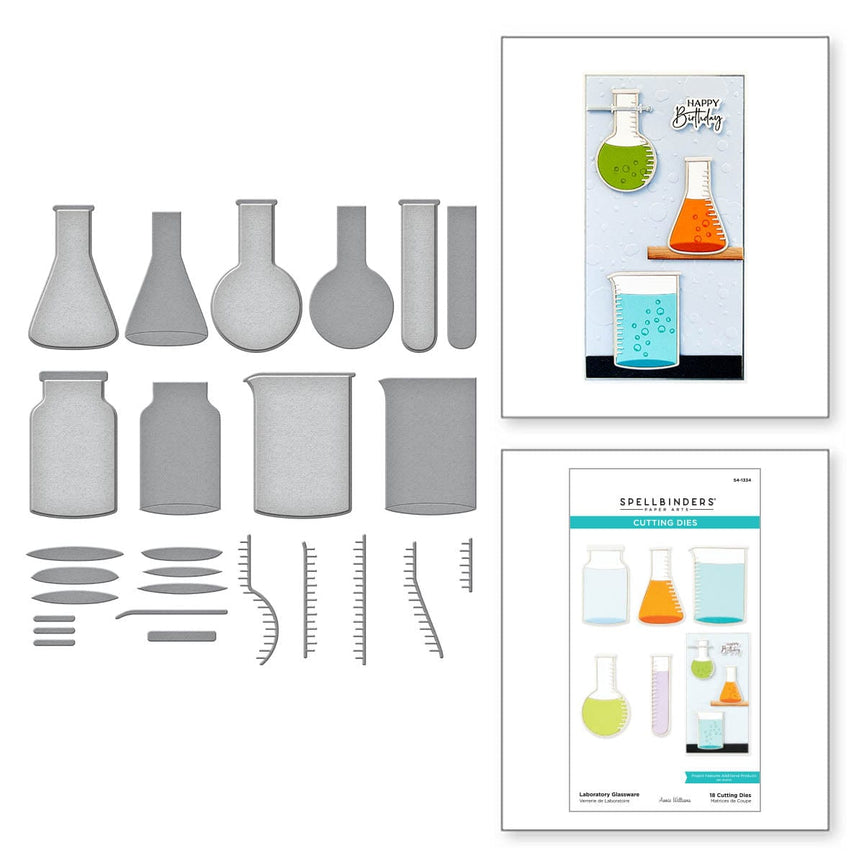
I thought I'd see if these worked for a generic celebratory card - it could be for a budding chemist, someone celebrating exam success or maybe for someone who just loves mixing cocktails!

I used ink and pearly mousse on smooth white card then cut out the pieces I needed to build up the various shapes - I love the detail of the measurement scale on the side of the jars! 

Once I'd assembled all the jars and adhered them to my card base I used my multi-sized hole punch to cut 'bubbles' from spare card. I added drops of Glossy Accents to those then added the pc generated sentiment and some coloured 'pebbles'  to echo the bubbles
You can't have too many bubbles!
 
Items used:
 

******

Just a Note about my Links
The links to the items used are my share-a-sale links which mean that if you use them I may get a small 'thank you' payment
  HERE, also is my Affiliate Link to the Spellbinders store - you can use this at any time to access the store, and I'll really appreciate it if you do
Using these links doesn't cost you anything at all!
There's a UK based shop now, so you can use the 'Visit Our UK Store' button at the top right of any page on the Spellbinders site 
thank you! 

******
Thank you so much for coming by
 
 Happy Crafting, Take care of yourself,
 
Kathy xx

Daisy, Daisy


Hello! 
Welcome to my little crafting place! 
 
Today is Friday, so its Daring Cardmakers Day and I'm actually managing to post on the right day.  If not exactly early...
This week Joanne is sending us round in circles - which, to be fair is my regular state of mind!

Joanne here this week and I’d like to see 

circles 

You might use circles as a design element, frame a focal point with a circle, stamp an object that contains circles (bikes have wheels, clock faces, dream catchers etc).

See some circular inspiration from the design team HERE      

Its been a while since I made a Circle card and they are fun to make - its all about getting the balance right so that when they stop rolling they are the right way up! For this one, it was easy - I just added more leafy sprigs until it was right!

As it happened I had a circle already cut from a piece of card embossed with the new Leafy Helix embossing folder, and I also had spares of the pink and white daisies I'd been using on other projects.  The sentiment was from a set I'd made and printed in a 'useful' shade of green that seems to work with lots of projects!


I used a circle die to cut the base card then added the flowers and sentiment. I cut out one each of the leafy dies and cut them into pieces, then tucked them amongst the flowers, standing the card up every now and then to check whether it was correctly balanced.

Items Used:

Leafy Helix Embossing Folder 

Just a Note about my Links
The links to the items used are my share-a-sale links which mean that if you use them I may get a small 'thank you' payment
  HERE, also is my Affiliate Link to the Spellbinders store - you can use this at any time to access the store, and I'll really appreciate it if you do
Using these links doesn't cost you anything at all!
There's a UK based shop now, so you can use the 'Visit Our UK Store' button at the top right of any page on the Spellbinders site 
thank you! 

******
 
Am I the only person who loves it when I find that it was worth saving all those bits and bobs from other projects because they come together to make something else?
 
Thank you so much for coming by.
 
 Happy Crafting, Take care of yourself,
Kathy xx


Wednesday, April 10, 2024

We're Rooting For You

Hello

Welcome to my little crafting place! 
I've been working with some of the brand new April releases from Spellbinders during the last few weeks so will be sharing what I've made over the next few days.
One of the new collections is the Propagation Garden Collection by Annie William, and honestly, I was so happy to get my hands on these dies - they are just so cool! 
 First up is this card using some of the little plants from the
and the cute jar from
 Laboratory Glassware 


I love the layers on the leaves and especially the roots in the 'water' - how cute is that?
 I just couldn't resist a pun for the sentiment - just perfect for a good luck card!

I inked up a sheet of white card on both sides using several green inks so that there was plenty of colour variation tand choice for where to place the dies. This meant I could cut the leafy shoots for the Lucky Bamboo stems on a really pale piece - I used to have some of these years ago. 
For the jars I inked up after cutting from white card.  I added some light blue mousse fot the jars and their outlines, and a swoosk of an aqua shade of ink for the water. 

Once I'd assembled all the jars and plants (adding dimension with tiny bits of foam where I could) I adhered them to my card base and added the pc generated sentiments
Finally I gave the 'water' a coat of Glossy Accents and crossed my fingers that it would dry without going messy!
 

 I really hope you like it!

******

 I would love it if you'd use my Share-a-Sale link

  HERE is my Affiliate Link to the Spellbinders store - you can use it to access the store any time, and I'd really appreciate it if you did, don't worry, it doesn't cost you anything!
There's a UK based shop now, so you can use the 'Visit Our UK Store' button at the top right of any page on the Spellbinders site  

******
Thank you so much for coming by
 
 Happy Crafting, Take care of yourself,
 
Kathy xx

Tuesday, April 09, 2024

It's a Generation Thing


 Hello

Welcome to my little crafting place!

 Its a Spellbinders Monthly Club day today and this time my project uses the fabulous April Small Die Club set.  Its a stitching themed set with words that can be used on their own or highlighted by stitching through the little holes, but I was inspired by the old embroidery floss box that was mum's, and I have in my craft space because you never know when you might need a bit of embroidery thread!

This is such a cute die set, the skeins are about 'life size' and the little black and gold wrappers are just the perfect finishing touch.

Mum's box is pretty stuffed with embroidery skeins and also some tapestry yarn so another box will take the strain off what must be almost an antique!
I started by making a box roughly the same size as Mum's original one and covering it with some white card printedwith a digital linen look sesign, The thin, extra layer of card gives more stability to
the finsihed box

Next step was cutting and assembling the pieces for the skeins in lots of different colours. I'd made quite a lot before deciding to stick to variations of just one colour!  So I do have quite a lot spare to make other things with!

And finally, here are 3 generations of stitching 'stuff' - my pin cushion, thimble and the new thread box, my mum's threads box full of her skeins of embroidery threads and my Grandma's darning mushroom!
 
I studied needlework/dress at A level and the course covered every  kind of stitching you can imagine, dress design, pattern-making as well as garment making, so I do actually 'know' quite a lot about all that stuff, including how to darn.
 Not that I've actually done any such thing since making my sample book!

~~~~~~~~~~~~~~~~~~~~~~~~~~~~~~~

  THIS is my Affiliate Link to the Spellbinders store 
-  you can use it to access the store whenever you buy from Spellbinders
It doesn't cost you anything, but I may get a little reward for pointing you there.
There's a UK based shop now, so you c use the 'Visit Our UK Store' button at the top right of any page on the Spellbinders site 

~~~~~~~~~~~~~~~~~~~~~~~~~~~~~~~

Thank you so much for coming by

 Happy Crafting, Take care of yourself,
 
Kathy xx

Friday, April 05, 2024

A Jug of Spring Flowers


Hello! 
Welcome to my little crafting place! 
 
Today I’ve a catch up post because I missed posting my Daring Cardmakers card over the Easter weekend

 Rizwana said:

This week I would love to see
your Easter themed cards. Choose anything celebrating
the Easter Season: Easter eggs, bunnies, chicks,
daffodils and tulips.
Check out all the inspiration from our design team and don't forget to share your creations with us!

I'd already made and shared the Easter cards I needed to send this year, so I made another, but made sure it was something I could change the sentiment on - is that cheating?

Ifound a piece of digital paper in my scraps box which was pefect to use ans a background for a jug of Spring flowers.  The jug is from The Botanical Solarium die set and I cut it from a leftover embossed and inked piece made for the week before's challenge.


 The tulips were cut using dies from Garden Builder set

And the flower sprigs at the back aremade using my current favourite of the Sealed sets: Sealed Botanical Sprigs  - all these sets by Spellbinders

******

Just a Note

If you buy from Spellbinders and you're happy to help out a crafty
 friend with a stash addiction...
  HERE is my Affiliate Link to the Spellbinders store - you can use it to access the store any time, and I'd really appreciate it if you did, don't worry, it doesn't cost you anything!
There's a UK based shop now, so you can use the 'Visit Our UK Store' button at the top right of any page on the Spellbinders site  

******

Thank you so much for coming by.
 
 Happy Crafting, Take care of yourself,
Kathy xx


April Elemental Inspiration


  Hello
Welcome to my little crafting place! 
 
Today I’m sharing my card for the new Daring Cardmakers challenge:

April Elemental Inspiration Challenge 

 Rizwana and Shabneez have joined together to host this week and their mood board has hints of Spring and lots of pretty colours.  
There's lots of inspiration to be found in there.
Remember just choose at least 3 elements to use when you make your card.

Time was short for my this week so I wanted to keep it simple!  I chose to use the colours the stems and the striped pattern made by the purple balustrade in the top right of the picture

 I started by using the fab striped background plate from the March Glimmer of the Month club (its one of those that's going to be used for years!). I then used a few different inks and embellishment mousses (Nuvo)to  add the pinks and lilac shades.

Next I used a really old favourite from a set of Spellbinders border dies to cut the curvy panel.  I looked to see if it was still available, but its no longer in the store, sorry!

At this point I added the lengths of lilac waxed thread , crossing them where I would add the sprigs

I am a total sucker for the fabulous sets of 'Sealed' die sets, they are so cute and versatile and brilliant on their own or to add into bouquets etc.  

This one is my latest favourite!

 Sealed Botanical Sprigs  by Spellbinders (of course).

 Sealed Botanical Sprigs   
 

To complete the card I made a bow from the lilac thread and adhered over the stems.
I'm not sure what this one will be used for so I'll add the right sentiment when the time comes!

******

Just a Note 

If you buy from Spellbinders and you're happy to help out a crafty
 friend with a stash addiction...
  HERE is my Affiliate Link to the Spellbinders store - you can use it to access the store any time, and I'd really appreciate it if you did, don't worry, it doesn't cost you anything!
There's a UK based shop now, so you can use the 'Visit Our UK Store' button at the top right of any page on the Spellbinders site  

******
Thank you so much for coming by

 
 Happy Crafting, Take care of yourself,
 
Kathy xx


Wednesday, April 03, 2024

Glimmer Embroidery

 Hello

Welcome to my little crafting place!

 Its Spellbinders Monthly Club time again

 This time my project uses the fabulous April Glimmer of the Month set, along with another of the seals I've made with the cross-stitched heart design Wax Seal of the Month
 I couldn't really choose which of the 'embroidery stitch' plates to use so I used them all.  They come seperrately so you can use however many you want,

 
I taped the plates in a haphazard kind of arrangement onto a deep turquoise linen look digi design printed onto white card and attached it to the base card.  This is the foikl that comes with this month's set and it looks absolutely stunning on the dark background.
I made a tassel and added it behind the wax seal - which I actually did some sewing through - don't ask me why, it just seemed a good idea at the time!

For the sentiment I used another of those in the April Glimmer club set, but I also used the back of a plate from another Glimmer set to 'reverse foil' a scrap of card for the backing piece
To finish I added a few loops of gold thread to pull it all together
 
~~~~~~~~~~~~~~~~~~~~~~~~~~~~~~~

  THIS is my Affiliate Link to the Spellbinders store 
-  you can use it to access the store whenever you buy from Spellbinders
It doesn't cost you anything, but I may get a little reward for pointing you there.
There's a UK based shop now, so you c use the 'Visit Our UK Store' button at the top right of any page on the Spellbinders site 

~~~~~~~~~~~~~~~~~~~~~~~~~~~~~~~

Thank you so much for coming by

 Happy Crafting, Take care of yourself,
 
Kathy xx


Cross Stitch in Wax

 Hello

Welcome to my little crafting place!

 Its Spellbinders Monthly Club time again

 This time I'm sharing a project using the beautiful Wax Seal of the Month stamp paored with a couple of plates from the Glimmer of the Month set as the Cross Stitch plate matches so well.

 I've made a whole load of these gorgeous wax seals; quite a few using the pretty shade of blue wax you get along with the seal, and lots using diffferent wax colours and even different techniques
I've used a linen look paper design as the background, Hot Foiled the cross stitch glimmer plate twice so they cross each other then added the white on blue Seal.
While I was making the seals I used any wax left in my spoon to make some cross stitches. 'threads' and little dots to use as extra embellishments - so you can see thoise on the card too!
 
To finish the card I used one of the April Glimmer sentiments on one of the offvuts of the background paper and added one of thos wax dots, along with a bow made from waxed twine
You can see some of the seals I've made with this fab cross stitch hear seal dotted around in the photos and I've another project where one of them features to share soon

 What do you think?
~~~~~~~~~~~~~~~~~~~~~~~~~~~~~~~

  THIS is my Affiliate Link to the Spellbinders store 
-  you can use it to access the store whenever you buy from Spellbinders
It doesn't cost you anything, but I may get a little reward for pointing you there.
There's a UK based shop now, so you c use the 'Visit Our UK Store' button at the top right of any page on the Spellbinders site 

~~~~~~~~~~~~~~~~~~~~~~~~~~~~~~~

Thank you so much for coming by

 Happy Crafting, Take care of yourself,
 
Kathy xx